
This is the first piece of clothing I have ever made from a
bought pattern. I absolutely love it but I admit I was terrified! Irrationally
so as surely having all pieces provided along with a set of instructions has to
be simpler than the hit and miss guesswork I have been using up to now. There
is something slightly - okay incredibly intimidating about using a pattern. It
feels like proper grown up serious sewing.
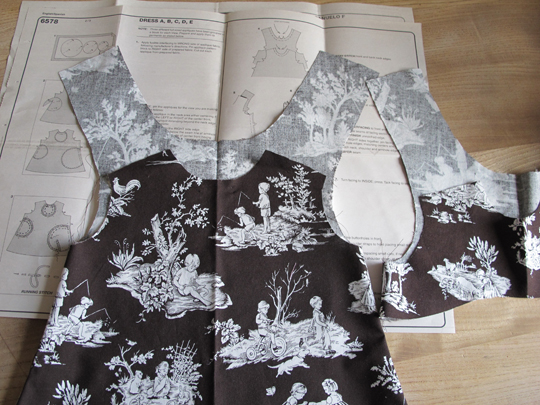
The pattern, New Look 6578, is classed as easy but I spent weeks
staring at the instructions barely able to make head nor tail of them. I even
read them in Spanish but was still completely bamboozled.

Eventually I gathered my courage, measured up my girl and
started cutting out – a lovely brown and white Michael Miller fabric with a
voile design of children playing. I was going through a heap of different
fabrics with her mentally crossing my fingers she wouldn’t choose something too
pink and princessy and amazingly she picked the brown. Little P is a tall slim
2 and half year old so I went for the size 2 pattern but added the length of
the size 3. Phewee. So far so good.
I had four pieces for my a-line dress – a front, back, front
facing and back facing. I finally figured out that facing meant a sort of
lining in the same fabric, in this case around the armholes and neck line. I
was still struggling with the instructions, so I decided to dump them and turn
to good old google instead.
It threw up this great little video tutorial for a similar
a-line dress. The construction was slightly different with a back fastening
instead of over shoulder fastenings but it helped me figure out what I was
aiming for. Mainly it gave me confidence to just crack on and stop worrying
about everything being perfect. The lady in the clip effortlessly slings the
thing together. I followed her good advice to pin and iron every step of the
way and it definitely helped the finish.
But even after all my careful ironing the facing kept
flipping up under the arms, so I ran a few stitches below and parallel to the
armholes to keep it in place. I skipped the interfacing so maybe that would
have helped. My way worked fine.
I tried a couple of new tricks. In the absence of a serger,
I zigzag stitched the raw edge of the facing. It wasn’t perfect but it was
okay. And for some mysterious reason I decided to attempt a French
seam down the side seams. It was pretty easy and looked lovely.

And of course there were buttonholes to contend with. I
nearly bottled out and used press studs. I didn’t have the patience to figure
out how to machine sew them so I hand sewed. Here I am looking very
serious stitching away on holiday.

They were a long long way from perfect but they work and the
beautiful pearly pink vintage buttons from love buttons disguise my poor sewing.

The finished dress is gorgeous. Once I was over my initial
confusion it was pretty straight forwards. The fit is lovely but there is zero
growing room. Next time I would use less generous seam allowances and add an
inch or two to the length. I also realised after the event that I had got my
buttons and buttonholes the wrong way round. Oops.
I
would definitely make this dress again now I kind of know what I am doing. I
have my eye on a lovely blue and white ikat print...
What an adorable dress (and model!). The fabric choice is inspired - lovely :)
ReplyDeleteThank you!
ReplyDeleteI love your website! I do have a question about this pattern. I laid out the fabric ready to make my grandbaby a new jumper. I stood there looking at the directions and pinned the pattern pieces to the fabric, but when I looked at the directions it had the selvages on the side and the folds top and bottom. I think I might be having a senior moment here? Is there a reason why they have the selvages on the side instead of on the top?
ReplyDeleteThank you Susan O! I am no expert but it sounds like you laid out the pieces just right. I think the selvages usually go down the side but for plain fabrics and some patterned fabrics you could turn them around the other way and have the selvage along top and bottom and it would make no difference.
DeleteI finally got it figured out and made two jumpers. I found a blog and she had a picture showing how the selvages meet in the middle which is what the pattern layout showed but that made zero sense to me. That worked fine for the first jumper because it was a size one, but the 2nd jumper was a size 4 and the flare overlapped the selvages so I cut it out the normal way. When it came time for the buttons I remembered what you said, so I double checked. I don't think it makes any difference, because your dress is adorable :-)
Delete