Pages

Showing posts with label fabric. Show all posts

Monday, November 11, 2013

Pass the chair

My mum bought this chair second-hand as a student in London in the late '60s. It was a leather armchair then and apparently she planned on reupholstering it but never got round to it. When she told me she was throwing it out - she had literally dumped it in the back garden - I said I'd sell it on ebay for her. But when I saw it, I felt I needed to rescue it myself. It is not in the greatest nick.
It could look amazing with a really brightly coloured floral fabric. I love these from Bluebelle Grey.
I want them all! 
I adore these designs by Zoe Barker 
 How fabulous is this deer?
Or this one from Designers Guild
There is something quite hideous but also strangely appealing about this one also from Designers Guild.
Maybe not.
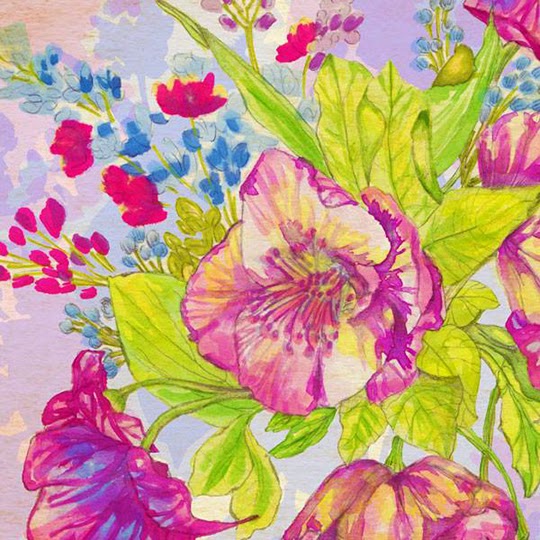
These delphiniums on yellow by Harlequin are rather cheerful.
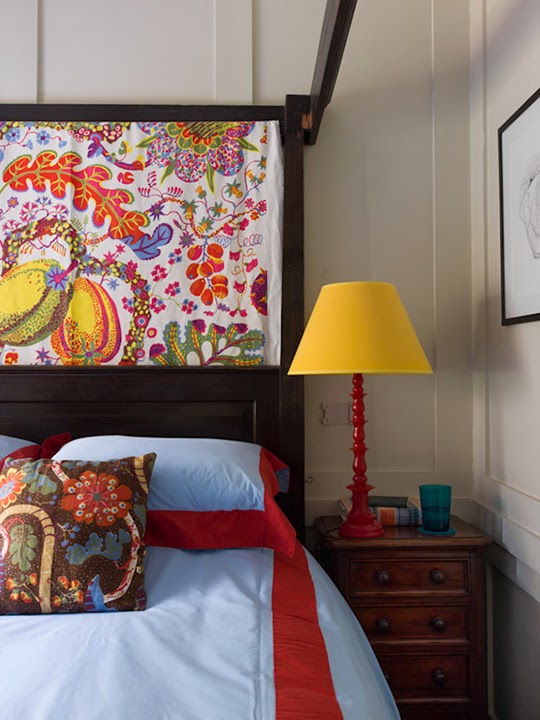
Or something more retro. How gorgeous are these Josef Frank fabrics in Ben Pentreath's London flat?
I am in love! 
This fabric with the pomegranates by Harlequin is not dissimilar.
Or this large leaf design from Harlequin again.
Not as colourful, but I love these ferns from Sanderson.
Decisions, decisions. I have a niggling feeling that I may have taken this chair on with the same intentions my mum had forty plus years ago and that they may remain just that - ideas. Maybe another forty years down the line little P will rescue this chair from me full of plans to revive it. It could just become a family tradition of pass the chair. Why not!?

Monday, August 19, 2013

Get shorty

I made good on my promise to little M to sew him a pair of shorts. I loved that he chose the material himself and knew exactly what he wanted doing with it. We were at a needlework fair in the village hall and I was hunting for blue and white fabrics for a quilt when he spotted this turquoise and orange 'sea creature' fabric and asked if I could make shorts from it. How could I refuse!
I love seeing boys in cheerful colours and patterns instead of navy blue and beige all the time.
I had a lot of fun making these. I didn't follow a pattern which was actually a huge relief. Instead I took a pair of shorts little M already owns and made my own pattern pieces from them. Two identical pieces for the front and two for the back. Here they are laid out on a folded piece of fabric. I've got the front pieces upside down but with this fabric it didn't really matter.
I could have done with making the waist even higher as later on you have to fold it over a couple of times to make an elastic casing round the back. Here are the four cut out pieces ready to be turned into shorts!
 And here they are again sewn up at the front and back where the tummy and bottom go.
 Next job, iron out the seams. 
Then join the two pieces together along the inside legs.
I started sewing from the bottom of one leg, up to the crotch and down the other leg in one fail swoop.
Next I sewed up the sides then ironed out all my seams.
Looking good!
To make the waistband I folded the top over twice and ironed. Once to tuck away the raw edges and again to make a casing for the elastic. I wish I had allowed more fabric for the waistband. It was a tight squeeze threading the elastic through and I had to use slightly thinner elastic than I would have liked.
I sewed along the bottom of the waistband around the back only first.
I cut a piece of elastic about the width of my shorts.
Then with a safety pin in one end I threaded it through the waistband pinning it at one end so it didn't pull it right through!
Next I tried the shorts on my boy and adjusted the elastic to get a good fit.
Then I sewed on top of the waistband side seams to secure the elastic in place and hold the waistband down.
I snipped of the excess bits of elastic then sewed the waistband down around the front. After a few wears I am seeing lots of creasing in the front waistband so maybe a bit of interfacing could help with that? Next time.
And finally I hemmed the shorts and they were good to go.

Okay the fit is not quite Saville Row but they are light and comfy and lots of fun.

Tuesday, August 13, 2013

Strawberry sundress - New Look 6796

I've been on a complete sewing spree this summer. I feel like I've made several evolutionary leaps forwards. I've tackled zips, bias binding tape, gathers. I've even drafted my own patterns. A year ago I could barely sew in a straight line let alone breath at the same time. I still struggle big time with understanding patterns and I am a little intimidated by my sewing machine - okay quite a lot. But I am getting more and more ambitious about what I tackle.
This super cute sundress is a New Look pattern. I went for view A but without the ruffle along the bottom - too fussy. The fabric was from my perennial favourite, fabricland. I love that nothing costs much more than £3 a metre. I'm too scared to cut into anything more pricey! I opted for age 2 width and age 3 length and like the other New Look pattern I tried a few months back, the fit was just right.

I was so happy with the finished garment but this dress threw quite a few curve balls at me. For starters my sewing machine was playing up and some of my stitches were loopy and loose especially down the side seams. I kept rethreading and checking in a very OCD way that my needle was up and the presser foot raised. I tried adjusting various dials but couldn't get a neat stitch. I think either the cotton thread was at fault. It was Coats but seemed slightly 'hairy'. Maybe it was a dud reel. Or possibly I threw everything out of kilter when I forced a zip under the wrong presser foot.
Also I was not anticipating having to make my own bias binding tape - eek! Or add gathers. This pattern was supposed to be easy! I read a couple of Dana tutorials here and here and did a pretty decent job of both. In fact I can see there is something quite addictive about making bias tape. I was slightly thrown by the different shape and size of the 'bib' in the illustrations compared to the pattern pieces. They seemed completely different and I wasn't quite sure what I was aiming for. I'd love to see other people's take on this dress.
I would make this dress again. I'm quite keen to have a go at view B which uses bias binding for the straps as well as neatening off the armholes. But before I do, I really need to make something for my ocean-mad little boy. That's a toy shark he's clutching. He has already picked out some fabulously jazzy underwater sealife fabric with strict instructions that I am to make a pair of shorts for him.

Friday, August 9, 2013

Charlotte's Web dress - Butterick B4718

The original plan was to make this Butterick dress for little P's birthday back in June. I had this cute blue and white gingham fabric with pink roses, which I thought would work perfectly with dress C but with the shorter length of dresses A and B.
 
I was toying with the idea of a Charlotte’s Web themed birthday party and I thought little P would make a great Dakota Fanning in her gingham dress. Okay I know the two dresses are totally different. It was more an inspired by than an actual copy of the dress below.
 
As a kid I longed for a proper big girl dress with a skirt that spun out when I twirled around and a waist around my middle and not up about my earholes. As far as I know little P doesn’t share this dress dream. But if there is a decent dose of pink thrown in, it’s all good in her book.
 
Back to the birthday - I had a mental picture of the garden full of hay bales, a petting zoo with piglets, spider's web-shaped climbing ropes hanging from the trees. It would have been amazing but in the end I didn't get the dress finished in time and the only nod to Charlotte was the pig-shaped cake. We all had a great time even without the extra Charlotte paraphernalia!
 
The reason the dress was only half cut out on the eve of her birthday was I ran out of fabric. I made a silly mistake early on and misread the layout instructions. I hadn’t understood that a piece which is shown half dotted half plain in the layout is actually one piece not two and you are supposed to cut it out last of all. Well I snipped it in two and was suddenly missing half my bodice.
There wasn't time to get more fabric - in fact the shop had completely run out - so I put the whole project to one side. When I came back to it recently, I realised if I lined it in a contrasting fabric and turned one of my back bodice pieces into a front piece it might just be salvageable. Luckily I'd cut out the back as one piece not two. I already had a bubblegum pink zip to go with the roses so I picked out a matching pink lining fabric. I really liked the little peek of pink at the neckline and armholes. In fact I was really proud of how the bodice turned out. Everything lined up and looked really neat.
The zip was more troublesome. I couldn't make sense of the instructions and wasn't even sure what sort of zip I was aiming for. After a fair amount of pinning and experimenting I figured out how to attach the zip to the outer fabric. I then sewed as close as I could to the zip teeth with my regular presser foot. It worked fine but I seem to have sent the thread tension out of whack ever since!
I was completely bamboozled about how to attach the lining fabric to the zip and hide the raw edges. I had already sewn up the side seams and attached the bodice to the skirt so there was no way of turning the fabric inside out. I really didn't want any raw edges along the zip so hand sewed the zip to the lining inside which looked okay. 
Sometimes dressmaking feels like figuring out a rubix cube. I think next time I would attach the zip to the bodice before sewing on the skirt so I could machine the inside. I would also tuck away all those raw edges where the skirt joins the top. Maybe I'd have to hand stitch all the way around the waist?
The finished dress looked great but initially the fit was terrible. I used age two sizing for the width and age three for the length as that matched little P’s measurements most closely. The length was fine but it was ridiculously large around the body. Rather than unpick the zip - I couldn’t face it - I snipped it out and bought a new one. It was only 40p. Then I took the whole thing in by a couple of inches around the back. I thought it might throw the armholes out of kilter but it worked just fine.
And here it is. It's pretty. It's comfy. It has a satisfyingly swirly skirt. It's great for a party or just playing out in.
She loves it! I love it and would definitely give this pattern another go.