Pages

Thursday, December 20, 2012

Christmas cards

I always run out of Christmas cards and this year was no different so we made a few batches of homemade ones too and I think they look pretty good.
We had a Jackson Pollock moment in the kitchen and made these.
And Little M made this fine drawing of Rudolf and a holly bush.
A few sparkly stickers later and our Christmas masterpieces were complete.
Right gotta brave the chilly weather and catch that last post.

Wednesday, December 5, 2012

Top ten movies for pre-schoolers

We are big movie fans in out house which is lucky as little M has had more than his fair share of illness over the last four years meaning lots and lots of convalescing on the sofa in front of the telly. The upside to this couch potato lifestyle has been an amazing early film education.
He is at school now and his health is a million times better (touch wood) so his TV time is more limited. I kind of miss our movie marathons and now that chapter of our life is over, it feels like a good time to look back at some of our favourites.

So, here they are in no particular order...

My Neighbour Totoro
Two sisters and their father move to the countryside. They meet a woodland spirit Totoro who helps them through a difficult time while their mother is in hospital. If I have made it sound really boring and depressing, it isn't. It is wonderful and magical. The voice-overs by real live sisters Elle and Dakota Fanning are phenomenal.


Up
A grumpy old man ties a huge bunch of helium balloons to his house and flies to South America accidently taking with him a boy scout who was out on the porch. They make friends with a talking dog and a huge bird, defeat baddies and find the father-son bond that was missing from their lives. Wonderful.
Finding Nemo
Another father son story from Pixar. This time Nemo, a clown fish, is stolen by a deep sea diver. His worrywart father must find him with help from an amnesiac fish. It's funny, exciting and moving and the underwater sequences are spectacular. Some scary bits for little ones so keep your finger poised on the remote.


Jungle Book
Gorgeous animation, fantastic characters, wonderful songs, great story. What is not to love in this classic Disney movie about Mowgli the little boy raised by wolves?
 Kiki's Delivery Service
A young trainee witch moves to a new town to hone her magic skills and starts a cake delivery service on her broomstick. The story is very slight but this film is so lovely and charming I am always happy when the children request it.
Cars
This is fast and furious, the antithesis of Kiki. Lightening McQueen an upstart young racing car finds himself in the middle of nowhere just when he should be in California competing in the race of his life. But first he needs to learn about humility and teamwork and make some real friends. Brilliant.

Pinocchio
Frankly I find this movie downright scary but it was a favourite with little M for a while. The old style Disney animation is wonderful and the songs are great.
Toy Story 3
There are moments in this that are too dark for under 4s, but it is such a magnificent movie I had to include it and you can always employ the ff button. I saw this at the cinema with the children when little P was just a few weeks old and I wept buckets. I still cry at the end. I'm feeling emotional just thinking about it.

 
Winnie the Pooh
The classic 1968 version. I never saw this as a child, so this is not a nostalgia pick. It is funny and sweet and still makes us giggle after about one hundred viewings.


Ponyo
Ponyo is a goldfish who turns into a girl and makes friends with a little boy called Sosuki. It is very loosely based on the Little Mermaid. I absolutely love Sosuki's mother. She is brave, strong, loving and very very cool. What a great female role model!


So that is our very personal pick. I think Little P's selection would be quite different. Lion King would definitely be in there and maybe Shrek. I am sure she would try and get a Dora Explorer DVD in even though it's not strictly a movie. WInnie the Pooh and Kiki would probably stay but I don't see Cars or Pinocchio making the cut.

I look forwards to our next stage of movie watching. I'm thinking Wizard of Oz, Star Wars trilogy, Indiana Jones, ET, Stand By Me, Bugsy Malone and Sound of Music

Bring it on!

Monday, December 3, 2012

Fabric advent calendar

The last time I made a Christmas craft was at playschool. It was a snowman tree decoration made from a loo roll wrapped in cotton wool, a painted egg carton hat, crepe paper scarf and a glittery button. I remember him so well because until he disintegrated a few years ago, he was still a fixture on the christmas tree at mum and dad's house.
Every year I think it would be fun to make an advent calendar and this year I finally got around to it. Well I was a day late but that was okay as the children got two days for the price of one.
Yay! Chocolate money!

If you want to make one too here's how I did it.

I ordered some cheap and cheerful Christmassy fabrics from Fabricland along with some green gingham ribbon and red and green felts. I got the 18" wooden dowels super cheap (about 25p each) online. You will also need bondaweb unless you have more patience than me and want to sew all the numbers on.
To make an 16" by 18" wall hanging I cut out one large 17"x40" piece and five smaller 4.5"x16" pieces. I was kind of generous with my seam allowances. You could cut smaller and still end up with five long pockets measuring 3"x15".
Okay, let's start with the backing. Take the large piece of fabric and fold it in half joining the two short ends together with the right side of the material on the inside. Sew the ends together, then iron out the seam. Hem both sides of your fabric, ironing the crease in first for neatness and ease of sewing. I was using polycottons and they were pretty slithery!

Next we are going to get the wooden dowels in place. Spread your backing piece, now neatly sewn together and hemmed, on the table with the seam at the back. I placed the seam near the bottom to give (a tiny bit) more weight to the hanging. Slide the dowels into place and draw a straight line across the top and bottom of your hanging where you want to place a seam to hold them in place. Remove the dowels and sew along your seams.
 
That's the backing done. On to the pockets. First we are ironing our pockets ready to hem them and sew them on later. Fold over the short edges of each piece and iron. 
Then fold over the long edge which will become the top of your pocket TWICE and iron. Now fold over the long bottom edge just once and iron. Now snip off the tiny corners in the folds to reduce bulk. 
 Okay you can sew now but just along the top of each strip.
Your pockets are ready for some numbers.
I used red and green felt and printed out digits from 0 - 9 in century gothic, size 100. I also printed out the children's intitials to personalise each calendar. I used bondaweb to attach my numbers, but I am not convinced it is any faster than doing machine applique. I've never given it a go but maybe next time... 

I also drew out a plan of where each number should go. If you are mixing the numbers up this is so important, especially if you are doing more than one calendar.
Trace your numbers onto the papery side of the bondweb BACKWARDS. They get reversed when you finally iron them on. I found it easier to do with the paper against a window. You will need numbers from 1 to 24. I put the children's initials in the central pocket to take care of the spare 25th pocket.
Now iron your bondaweb numbers onto your felt, papery side up and rough side down against your fabric. Then get cutting. I had rubbish scissors and I found this bit really tedious but luckily we had some lovely friends round who were keen to take over the job. Thanks L and I!
Peel the paper backing off your numbers, place on your pockets using a ruler to space them evenly and you are ready to iron them on.
Put a damp cloth over your pockets and iron each number for about ten seconds.
Okay let's get those pockets on. Pin them in place.
Then sew along the sides and the bottom to fix them in place and hem them all at the same time. Don't sew along the top of your pockets or you won't be able to open them - disaster!
Nearly there. Divide each long pocket into five smaller ones. Use a ruler to space evenly.
Now sew along your chalk lines. I sewed one continuous line from top to bottom to save stopping and starting all the time. I was sewing in a rather wild and reckless fashion at this stage and also did a fair amount of unpicking. Pop your wooden dowels back in place. Tie some pretty ribbon to each corner and you have a lovely Christmassy personalised advent calendar.
Fill it with chocolate money, hair clips, shiney pennies, sweet notes, little sketches, conkers, acorns, lego, sequins, whatever. 
Enjoy and have a very happy Christmas.

Saturday, November 24, 2012

Patchwork progress

Things are happening on the patchwork front. I've picked out eight gorgeous fabrics for Little P's quilt. She chose the colour scheme pink (what else?) and green and I ordered a bunch of different fabrics over the internet, most of them from Fabric Rehab
absolutely love the floral fabrics they are so sweet and girly but also a bit cool and retro.
And how cute is Little Red and the wolf - or is it a fox?
I was working on the theory that if I liked a design and it fit the colour scheme it was bound to work with the others. Wrong!

had about as many hits as misses. For some reason the solid pinks and greens just weren't working. I thought they would act as background pieces, but sitting next to the prints they seemed to leap out and take centre stage, so back in the cupboard they went.
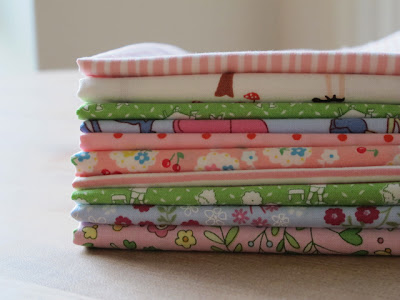
I also ordered a selection of gorgeous Scandinavian style designs in red and white and green and white. I adore them but they just don't work with the dainty florals, polka dots and stripes. They'll keep for another project. I see a lot of purses, cushions and dolly clothes in my crafting future.

My lovely postman also dropped off a rotary cutter and patchwork ruler the other day.

Looks like I'm all set. Time to get to work.

Thursday, November 22, 2012

Alphabet biscuits

Little M is learning to write - a tricky business for a left-hander. As a fellow lefty I completely emphasise. The letters feel back to front, you can’t see what you’re doing and anything you do manage to get down you smudge over anyway. The whole process feels totally counter-intuitive. Oh yes and to add to the fun they are learning joined up handwriting from the start.

I need to bring back a love of the written word to our household before Little M chucks down his pencil in despair.

I am thinking biscuits – in the shape of letters – decorated with lots of sweeties.
I made a basic shortbread dough by rubbing together 2oz caster sugar, 4oz butter, and instead of the usual 6oz of plain flour, I added 4oz flour and 2oz ground almonds for a vitamin D hit. I needed some way of justifying all that refined sugar.
The kids loaded their biscuits with jelly tots and smarties. And they were gone in a flash.
Ok that’s letters M and P sorted, only another 24 to go.

Sunday, November 11, 2012

Autumn beach

Don't you just love the beach out of season? Especially on a bright and bracing morning when you have the place more or less to yourselves.
A perfect day for throwing stones into the sea,
A spot of fishing,
And just enjoying a rare bit of sun on your face.
And don't you just love it when those fortuitous colour combos occur in photos? Like Little M's new winter coat perfectly toning in with the gas pipe signs.
This heart-shaped kite stuck up a tree made us smile.
Hope you had a great weekend too.